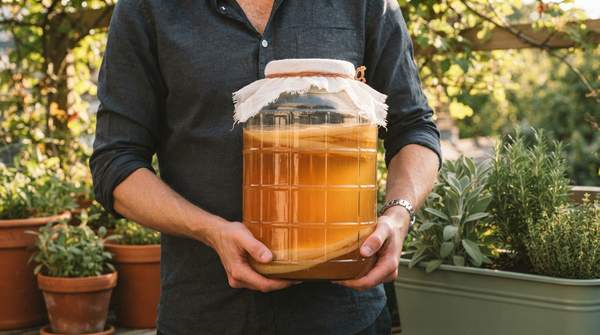
Yes, you can safely brew kombucha in your own kitchen — and the margin of safety comes down to three controllable things: temperature, acidity, and cleanliness. Kombucha is a fermented tea made from brewed tea, sugar, and a symbiotic culture of bacteria and yeast (a SCOBY), and regulators treat it as a food product, not just a hobby project. The New York State Department of Agriculture and Markets classifies kombucha teas as food subject to its regulation, and Pennsylvania's food safety guidance sets the key technical target: a finished pH below 4.6, which makes the beverage inhospitable to pathogenic microorganisms. This guide walks you through your first fermentation, the safety checkpoints that matter, a troubleshooting framework for the problems beginners actually hit, and the second fermentation that turns plain fermented tea into something fizzy and flavorful.
First Fermentation: Step-by-Step Guide with Safety Checks
The first fermentation turns sweet tea into kombucha over roughly seven to fourteen days, with about thirty minutes of hands-on work, according to the brewing guide at You Brew Kombucha. Start by boiling your water — food safety guidance published in the International Association for Food Protection's journal recommends bringing water to a rolling boil for about one minute, a step designed for pathogen reduction — then dissolving your sugar and steeping black tea for around ten minutes before removing the leaves.
Now the critical pause: let the liquid cool fully to room temperature, roughly 20–25°C (68–77°F), before adding anything living. The Institute of Culinary Education's beginner method follows the same sequence — strong unflavored black tea, cane sugar, then the SCOBY and starter liquid — and the food protection guidance adds a check many beginners skip: visually examine the SCOBY before adding it. Any discoloration (green, white, black, or gray) or a putrid odor could indicate mold, and that SCOBY should be discarded.
Cover the vessel with a clean cloth secured around the rim, which the food protection guidance explains prevents biological cross-contamination while letting air in and keeping insects out. Keep the brew between 70–80°F (21–27°C); the American Homebrewers Association warns that below 68°F fermentation slows or halts, while above about 85°F you risk mold or harmful bacteria. Start tasting around day seven — one microbiologist writing at Joyful Microbe recommends daily tasting on your first batch or two — and bottle when the balance of sweet and tart suits you, reserving a cup of starter liquid with your SCOBY for the next batch.
Ensuring Food Safety in Your Kombucha Brew
The safety logic of kombucha is straightforward: you are deliberately growing microbes, so you need the right microbes to win. Pennsylvania's brewing and bottling guidelines frame the whole process around achieving a final pH below 4.6, which produces what regulators call a non-TCS food — one that does not require temperature control to mitigate pathogen growth. pH test strips are the cheapest way to track this, and they are especially useful when you are working with a new SCOBY, which may ferment more slowly than an established one.
Temperature discipline is the other half of the equation. The boiling step at the start exists for pathogen reduction; the cooling step protects your culture, since hot liquid can kill the SCOBY; and the steady 70–80°F range during fermentation keeps the acid-producing microbes active enough to outpace anything unwanted. The clean cloth cover is not optional housekeeping — it is a contamination barrier.
Refrigeration is your final control. New York's regulators note that most kombucha is sold unpasteurized, with refrigeration as the control that prevents further fermentation and keeps alcohol below 0.5% by volume. The same principle applies at home: cold slows the culture to a crawl, which matters both for flavor stability and, as you will see in the bottling stage, for safety.
Kombucha Troubleshooting: A Decision Framework
Every new brewer eventually stares at the vessel and wonders whether what they are seeing is normal. The framework below matches the most common symptoms to their likely causes and the action the evidence supports, drawing a hard line between safe variations and critical failures. The single most consequential distinction: mold means the batch is gone.
| Observed Symptom | Likely Cause | Recommended Action |
|---|---|---|
| Fuzzy or dry-looking discoloration — green, white, black, or gray — on the surface, sometimes with a putrid odor | Mold contamination, often linked to temperatures above about 85°F or a compromised culture | Toss it: discard the entire batch and the SCOBY, sterilize your equipment, and start over |
| SCOBY floating sideways, sinking, or a new translucent layer forming on top | Normal behavior — the culture's position varies, and new layers are growth, not contamination | Keep it: these are healthy variations, not failures |
| Taste becoming increasingly vinegary or sharply sour | Extended fermentation; acidity keeps building as long as the culture works | Bottle promptly once the sweet-tart balance suits you; longer fermentation means more acidity |
| Finished kombucha flat, with no fizz | No second fermentation, or insufficient sugar for the culture to produce gas in the bottle | Add a sugar source such as fruit or juice and complete a second fermentation before refrigerating |
On mold, the American Homebrewers Association is unambiguous: "the best and safest course of action is to throw out the whole thing (SCOBY included), sterilize your equipment, and start over." Unlike some fermented foods, kombucha offers no protective margin for partial salvage — as their guidance puts it, you can't just scrape the mold off and continue, because kombucha lacks the protective layer that salt provides in ferments like miso.
Second Fermentation: Flavoring and Carbonation
The fizz that makes store-bought kombucha distinctive comes from a second, sealed fermentation. Once your first fermentation tastes right, strain out the SCOBY and transfer the tea into bottles along with a flavoring — fruit, juice, or aromatics like ginger or basil, as the Joyful Microbe guide suggests. The sugars in the fruit or juice provide a fresh food source for the cultures, which is exactly what generates carbonation in a sealed container.
Bottle choice matters for safety here. The American Homebrewers Association recommends PET plastic bottles, and for a practical reason: they can be gently squeezed during bottle fermentation to approximate the level of carbonation, and their twist tops let you burp them if pressure climbs. Fill the bottles with fermented tea, leave some headspace, seal them, and keep them in a warm spot for three to seven days, per the Institute of Culinary Education's method.
Then refrigerate. The low temperature halts further gas buildup, which is not just about texture — over-pressurized glass bottles pose a genuine risk of injury. The Homebrewers Association's approach is elegantly low-tech: give the bottles an occasional squeeze, and when they feel nice and tight, move them to the fridge.
Enjoying Your Homemade Kombucha
Once refrigerated, your kombucha holds its carbonation and flavor, and the Homebrewers Association suggests enjoying it within a couple of weeks. The flavored result should retain some sweetness, which the Institute of Culinary Education notes helps palatability. If you want more bubble without waiting, their guide offers a shortcut: add seltzer and a quickly dissolving sweetener like agave nectar at serving time.
Your SCOBY is reusable — after your first batch, you will likely never need to buy another, as Joyful Microbe's author puts it — and the starter liquid you reserve with it becomes the seed of your next gallon. Keep both covered and protected, and each successive batch tends to run more predictably than the first.
Two boundaries on this guide: it covers home brewing only, not kombucha for commercial sale, which falls under specific food safety regulations, and it is not medical or health advice about drinking kombucha. It also skips advanced techniques like continuous brewing and growing a SCOBY from scratch.
Your First Safe and Flavorful Batch
By following these step-by-step instructions, integrating food safety checkpoints, and utilizing the troubleshooting framework, you can confidently brew your first batch of kombucha at home. The process rewards attention at three moments more than any others: cooling the tea fully before inoculation, holding the fermentation in the 70–80°F range, and refrigerating bottled kombucha before pressure builds too far.
A successful first fermentation yields a tart, slightly sweet beverage with a healthy SCOBY, ready for flavoring and carbonation. That is your measurable finish line: around day seven, start tasting daily, confirm with pH strips that you are below the 4.6 threshold Pennsylvania's guidelines identify as the food safety boundary, and when the sweet-tart balance is right, bottle it — you will know your first batch worked the moment you pry open a tight, hissing bottle a week later.
Sources
- A Beginner’s Guide to Brewing Kombucha — ICE
- PA
- Guide to First Fermentation — You Brew Kombucha — Youbrewkombucha
- Foodprotection
- Making Kombucha at Home — American Homebrewers Association
- A Guide to Kombucha Fermentation and Microbiology - Joyful Microbe
- Kombucha Processing — Agriculture and Markets